Open Policy Agent(OPA)是一个开源的轻量级通用策略引擎,可以代替软件中内置的策略功能模块,帮助用户实现服务与策略引擎的解耦。得益于 OPA 完善的生态系统,用户可以很容易地集成 OPA 和其他服务,例如程序库、HTTP API 等。
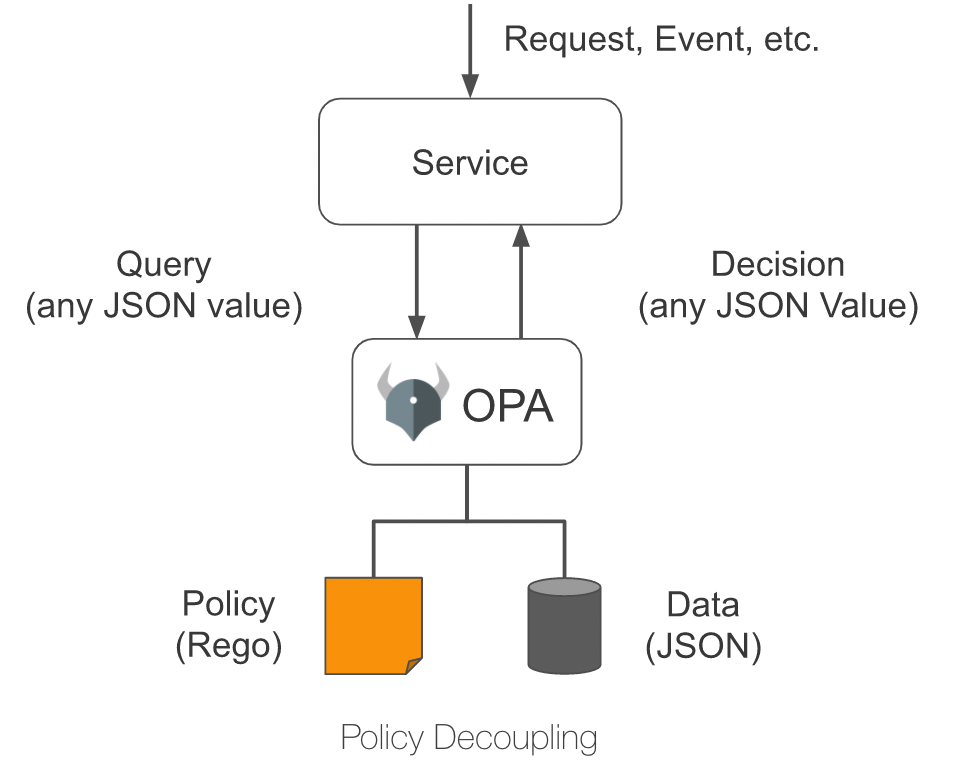
如下图所示,OPA 首先通过策略语言 Rego 描述策略;然后通过 JSON 存储策略数据,之后用户就可以发送查询请求。收到查询请求后,OPA 将结合策略、数据和用户输入的查询请求内容生成策略决策,并将决策发送至服务。
插件介绍
Apache APISIX 提供了一个 opa 插件,用户可以使用这个插件,便捷地将 OPA 提供的策略能力引入到 Apache APISIX,实现灵活的身份认证与准入控制功能。
将 opa 插件配置在路由上后,Apache APISIX 会在处理响应请求时,将请求信息、连接信息等组装成 JSON 数据,并将其发送到策略决策 API 地址。只要在 OPA 中部署的策略符合 Apache APISIX 设定的数据规范,就可以实现如通过请求、拒绝请求、自定义状态码、自定义响应头、自定义响应头等功能。
本文以 HTTP API 为例为大家介绍 opa 插件,并详细说明如何将 Apache APISIX 与 OPA 进行集成,实现后端服务的认证授权解耦。
如何使用
搭建测试环境
使用 Docker 构建 OPA 服务。
1# 使用 Docker 运行 OPA
2docker run -d --name opa -p 8181:8181 openpolicyagent/opa:0.35.0 run -s
创建
example策略。1# 创建策略 2curl -XPUT 'localhost:8181/v1/policies/example' \ 3--header 'Content-Type: text/plain' \ 4--data-raw 'package example 5 6import input.request 7import data.users 8 9default allow = false 10 11allow { 12 # 具有名为 test-header 值为 only-for-test请求头 13 request.headers["test-header"] == "only-for-test" 14 # 请求方法为 GET 15 request.method == "GET" 16 # 请求路径以 /get 开头 17 startswith(request.path, "/get") 18 # GET 参数 test 存在且不等于 abcd 19 request.query["test"] != "abcd" 20 # GET 参数 user 存在 21 request.query["user"] 22} 23 24reason = users[request.query["user"]].reason { 25 not allow 26 request.query["user"] 27} 28 29headers = users[request.query["user"]].headers { 30 not allow 31 request.query["user"] 32} 33 34status_code = users[request.query["user"]].status_code { 35 not allow 36 request.query["user"] 37}'创建
users数据。1# 创建测试用户数据 2curl -XPUT 'localhost:8181/v1/data/users' \ 3--header 'Content-Type: application/json' \ 4--data-raw '{ 5 "alice": { 6 "headers": { 7 "Location": "http://example.com/auth" 8 }, 9 "status_code": 302 10 }, 11 "bob": { 12 "headers": { 13 "test": "abcd", 14 "abce": "test" 15 } 16 }, 17 "carla": { 18 "reason": "Give you a string reason" 19 }, 20 "dylon": { 21 "headers": { 22 "Content-Type": "application/json" 23 }, 24 "reason": { 25 "code": 40001, 26 "desc": "Give you a object reason" 27 } 28 } 29}'
创建路由并启用插件
运行以下命令,创建路由,并启用 opa 插件。
1curl -XPUT 'http://127.0.0.1:9080/apisix/admin/routes/r1' \
2--header 'X-API-KEY: <api-key>' \
3--header 'Content-Type: application/json' \
4--data-raw '{
5    "uri": "/*",
6    "methods": [
7        "GET",
8        "POST",
9        "PUT",
10        "DELETE"
11    ],
12    "plugins": {
13        "opa": {
14            "host": "http://127.0.0.1:8181",
15            "policy": "example"
16        }
17    },
18    "upstream": {
19        "nodes": {
20            "httpbin.org:80": 1
21        },
22        "type": "roundrobin"
23    }
24}'
测试请求
接下来,请运行以下命令,向 opa 插件发送请求,测试插件运行状态。
1# 允许请求
2curl -XGET '127.0.0.1:9080/get?test=none&user=dylon' \
3    --header 'test-header: only-for-test'
4{
5    "args": {
6        "test": "abcd1",
7        "user": "dylon"
8    },
9    "headers": {
10        "Test-Header": "only-for-test",
11        "with": "more"
12    },
13    "origin": "127.0.0.1",
14    "url": "http://127.0.0.1/get?test=abcd1&user=dylon"
15}
16
17# 拒绝请求并重写状态码和响应头
18curl -XGET '127.0.0.1:9080/get?test=abcd&user=alice' \
19    --header 'test-header: only-for-test'
20
21HTTP/1.1 302 Moved Temporarily
22Date: Mon, 20 Dec 2021 09:37:35 GMT
23Content-Type: text/html
24Content-Length: 142
25Connection: keep-alive
26Location: http://example.com/auth
27Server: APISIX/2.11.0
28
29# 拒绝请求并返回自定义响应头
30curl -XGET '127.0.0.1:9080/get?test=abcd&user=bob' \
31    --header 'test-header: only-for-test'
32
33HTTP/1.1 403 Forbidden
34Date: Mon, 20 Dec 2021 09:38:27 GMT
35Content-Type: text/html; charset=utf-8
36Content-Length: 150
37Connection: keep-alive
38abce: test
39test: abcd
40Server: APISIX/2.11.0
41
42# 拒绝请求并返回自定义响应(字符串)
43curl -XGET '127.0.0.1:9080/get?test=abcd&user=carla' \
44    --header 'test-header: only-for-test'
45
46HTTP/1.1 403 Forbidden
47Date: Mon, 20 Dec 2021 09:38:58 GMT
48Content-Type: text/plain; charset=utf-8
49Transfer-Encoding: chunked
50Connection: keep-alive
51Server: APISIX/2.11.0
52
53Give you a string reason
54
55# 拒绝请求并返回自定义响应(JSON)
56curl -XGET '127.0.0.1:9080/get?test=abcd&user=dylon' \
57    --header 'test-header: only-for-test'
58
59HTTP/1.1 403 Forbidden
60Date: Mon, 20 Dec 2021 09:42:12 GMT
61Content-Type: application/json
62Transfer-Encoding: chunked
63Connection: keep-alive
64Server: APISIX/2.11.0
65
66{"code":40001,"desc":"Give you a object reason"}
关闭插件
得益于 Apache APISIX 的动态化特性,只需要移除路由配置中 opa 插件相关配置并保存,即可关闭路由上的 OPA 插件。
总结
本文为大家描述了 Apache APISIX 和 Open Policy Agent 对接的详细操作步骤,希望通过本文可以让大家对于在 Apache APISIX 中使用 Open Policy Agent 有了更清晰的理解,方便后续进行上手实操。
Apache APISIX 不仅致力于保持自身的高性能,也一直非常重视开源生态的建设。目前 Apache APISIX 已经拥有了 10+ 个认证授权相关的插件,支持与业界主流的认证授权服务对接。
如果你有对接其他认证授权的需求,不妨访问 Apache APISIX 的 GitHub,通过 issue 留下你的建议;或订阅 Apache APISIX 的邮件列表,通过邮件表达你的想法。