在过去的几个月,社区用户为 Apache APISIX 添加了许多插件,丰富了 Apache APISIX 的生态。从使用者的角度而言,更多样化的插件出现无疑是一件好事,它们在完善 Apache APISIX 高性能和低延迟的基础之上,满足了使用者对于网关的更多期望,即“一站式”和“多功能”。
社区的贡献者们是如何为 Apache APISIX 开发插件的呢?Apache APISIX 博客上的文章似乎都没有详细讲述过开发插件的流程。那么这次我们换一个视角,从插件开发者的角度出发,一起来看看一款插件诞生的全过程吧!
本篇文章记录了一个没有后端经验的前端工程师开发 file-logger 插件的过程。在详细说明实现过程之前,先向大家简单介绍下 file-logger 的功能。
功能介绍
file-logger 支持使用 Apache APISIX 插件元数据生成自定义的日志格式,用户可以通过 file-logger 插件将 JSON 格式的请求和响应数据附加到日志文件中,也可以将 Log 数据流推送到指定位置。
试想,在监控某一个路由的访问日志时,很多时候我们关注的不仅是某些请求和响应数据的值,还希望将日志数据单独写入到指定的文件中。这时就可以使用 file-logger 插件来帮忙实现这些需求。
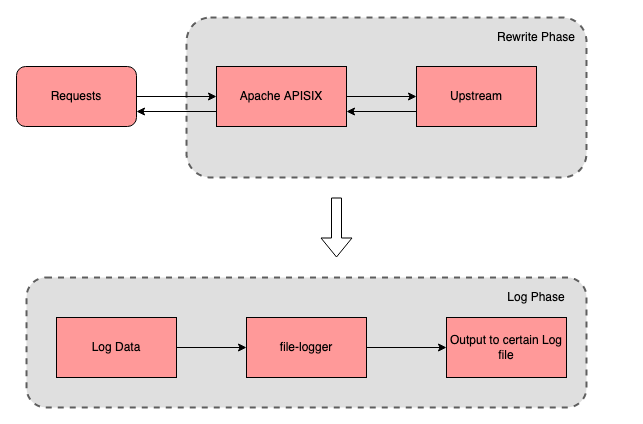
具体实现过程中我们可以通过 file-logger 将日志数据单独写入指定的日志文件,简化监控和调试的过程。
开发实现过程
介绍完 file-logger 的功能之后,大家也算对这个插件有了更多的认识。下面为大家详细讲解一下,没有服务端经验的我是如何从 0 开始为 Apache APISIX 完成该插件并添加相应测试的。
确定插件名称及优先级
打开 Apache APISIX 插件开发指南,按照先后顺序需要确定以下几项:
- 确定插件分类。
- 确定插件优先级,并更新
conf/config-default.yaml文件。
因为此次开发的 file-logger 属于日志类型的插件,所以我参考了 Apache APISIX 已有的日志插件的名称和排序,将 file-logger 放到了这里:
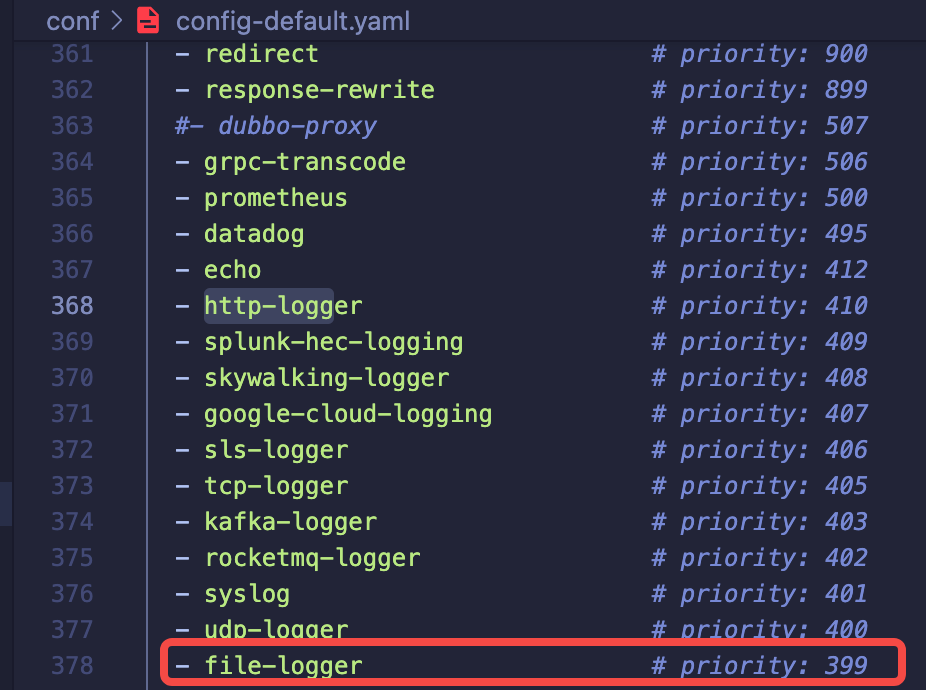
咨询了其他插件的作者和社区的热心成员之后,最终确认了该插件的名称 file-logger 和优先级 399。
需要注意的是,插件的优先级与执行顺序有关,优先级的值越大,执行越靠前。而插件名称的排序与执行顺序无关。
创建最小可执行插件文件
确认好插件名称和优先级后,便可在 apisix/plugins/ 目录下创建我们的插件代码文件,这里有两点需要注意:
- 如果是直接在
apisix/plugins/目录下直接创建插件代码文件,就无需更改Makefile文件。 - 如果你的插件有新建自己的代码目录,那么就需要更新
Makefile 文件,详细步骤可参考 Apache APISIX 插件开发指南。
- 下面我们在
apisix/plugins/目录下创建file-logger.lua文件。 - 然后根据官方给出的
example-plugin的例子做参考,来完成一个初始化版本。
1-- 在头部引入我们所需要的模块
2local log_util     =   require("apisix.utils.log-util")
3local core         =   require("apisix.core")
4local plugin       =   require("apisix.plugin")
5local ngx          =   ngx
6
7-- 声明插件名称
8local plugin_name = "file-logger"
9
10-- 定义插件 schema 格式
11local schema = {
12    type = "object",
13    properties = {
14        path = {
15            type = "string"
16        },
17    },
18    required = {"path"}
19}
20
21-- 插件元数据 schema
22local metadata_schema = {
23    type = "object",
24    properties = {
25        log_format = log_util.metadata_schema_log_format
26    }
27}
28
29
30local _M = {
31    version = 0.1,
32    priority = 399,
33    name = plugin_name,
34    schema = schema,
35    metadata_schema = metadata_schema
36}
37
38-- 检查插件配置是否正确
39function _M.check_schema(conf, schema_type)
40    if schema_type == core.schema.TYPE_METADATA then
41        return core.schema.check(metadata_schema, conf)
42    end
43    return core.schema.check(schema, conf)
44end
45
46-- 日志阶段
47function _M.log(conf, ctx)
48    core.log.warn("conf: ", core.json.encode(conf))
49    core.log.warn("ctx: ", core.json.encode(ctx, true))
50end
51
52
53return _M
通过 example-plugin 的例子完成了一个最小的可用插件文件后,便可通过 core.log.warn(core.json.encode(conf)) 和 core.log.warn("ctx: ", core.json.encode(ctx, true)) 将插件的配置数据和请求相关的数据信息输出到 error.log 文件中去。
启用插件并测试
下面通过创建一条测试路由,来测试插件是否能成功将我们为其配置的插件数据和请求相关的数据信息,打印到错误日志文件中去。
在本地准备一个测试上游(本文中使用的测试上游是我在本地创建的
127.0.0.1:3030/api/hello)。通过
curl命令创建一条路由并启用我们新增的插件。1 curl http://127.0.0.1:9080/apisix/admin/routes/1 -H 'X-API-KEY: edd1c9f034335f136f87ad84b625c8f1' -X PUT -d ' 2 { 3 "plugins": { 4 "file-logger": { 5 "path": "logs/file.log" 6 } 7 }, 8 "upstream": { 9 "type": "roundrobin", 10 "nodes": { 11 "127.0.0.1:3030": 1 12 } 13 }, 14 "uri": "/api/hello" 15 }'接着就会看到一个
200的状态码,表明已成功创建了路由。运行
curl命令向该路由发送请求,测试file-logger插件是否已经启动。1curl -i http://127.0.0.1:9080/api/hello 2HTTP/1.1 200 OK 3... 4hello, world在
logs/error.log文件中会有一条这样的记录:
可以看到, 在
conf参数中我们为插件配置的path: logs/file.log已经成功地保存了。到此我们已经成功创建了一个最小可用的插件,在日志阶段打印了conf和ctx参数的数据。之后,我们可以直接在该
file-logger.lua插件代码文件中,为它编写核心功能。这里我们可以直接运行apisix reload命令来重新加载最新的插件代码,而无需重启 Apache APISIX。
为 file-logger 插件编写核心功能
file-logger 插件的主要功能是写日志数据。在经过询问和查阅资料后,我了解到 Lua 的 IO 库,于是确认了该插件的功能逻辑大致为以下几步:
每次接受请求之后,将日志数据输出到插件配置的
path中去。- 首先,在日志阶段通过
conf拿到file-logger中path的值。 - 然后,通过 Lua IO 库来完成文件「创建」、「打开」、「写」、「刷新缓存」、「关闭」的操作。
- 首先,在日志阶段通过
处理「文件打开」失败、「文件创建」失败等错误。
1 local function write_file_data(conf, log_message)
2     local msg, err = core.json.encode(log_message)
3     if err then
4         return core.log.error("message json serialization failed, error info : ", err)
5     end
6
7     local file, err = io_open(conf.path, 'a+')
8
9     if not file then
10         core.log.error("failed to open file: ", conf.path, ", error info: ", err)
11     else
12         local ok, err = file:write(msg, '\n')
13         if not ok then
14             core.log.error("failed to write file: ", conf.path, ", error info: ", err)
15         else
16             file:flush()
17         end
18         file:close()
19     end
20 end
参考
http-logger插件源码,完成了将日记数据传给写日志数据的方法和 metadata 的一些判断和处理。1 function _M.log(conf, ctx) 2 local metadata = plugin.plugin_metadata(plugin_name) 3 local entry 4 5 if metadata and metadata.value.log_format 6 and core.table.nkeys(metadata.value.log_format) > 0 7 then 8 entry = log_util.get_custom_format_log(ctx, metadata.value.log_format) 9 else 10 entry = log_util.get_full_log(ngx, conf) 11 end 12 13 write_file_data(conf, entry) 14 end
验证及添加测试
验证收集日志记录
因为在创建测试路由时已经启用了 file-logger 插件,并且配置了 path 为 logs/file.log,所以此时我们只需给测试路由发送请求,以验证日志收集的结果:
1curl -i http://127.0.0.1:9080/api/hello在对应的 logs/file.log 中我们可以看到每条记录都是以 JSON 的格式保存下来。将其中一条数据格式化之后如下所示:
1{
2    "server":{
3        "hostname":"....",
4        "version":"2.11.0"
5    },
6    "client_ip":"127.0.0.1",
7    "upstream":"127.0.0.1:3030",
8    "route_id":"1",
9    "start_time":1641285122961,
10    "latency":13.999938964844,
11    "response":{
12        "status":200,
13        "size":252,
14        "headers":{
15            "server":"APISIX\/2.11.0",
16            "content-type":"application\/json; charset=utf-8",
17            "date":"Tue, 04 Jan 2022 08:32:02 GMT",
18            "vary":"Accept-Encoding",
19            "content-length":"19",
20            "connection":"close",
21            "etag":"\"13-5j0ZZR0tI549fSRsYxl8c9vAU78\""
22        }
23    },
24    "service_id":"",
25    "request":{
26        "querystring":{
27
28        },
29        "size":87,
30        "method":"GET",
31        "headers":{
32            "host":"127.0.0.1:9080",
33            "accept":"*\/*",
34            "user-agent":"curl\/7.77.0"
35        },
36        "url":"http:\/\/127.0.0.1:9080\/api\/hello",
37        "uri":"\/api\/hello"
38    }
39}
至此验证收集日志记录的环节结束了,验证结果说明插件成功启动并返回了应有的数据。
为插件添加测试
对于 add_block_preprocessor 部分的代码,由于我没有学过 Perl ,所以在刚开始编写时比较困惑。在询问之后才了解到它的正确使用方式:如果我们在数据部分没有编写相关的 request 断言和 no_error_log 断言时,那么默认断言如下:
1--- request
2GET /t
3--- no_error_log
4[error]
综合参考了一些其他的日志测试文件以后,我在 t/plugin/ 目录下创建 file-logger.t 文件。
每一份测试文件都由 __DATA__ 分为序言部分和数据部分。由于目前官网测试相关文档没有明确归档分类,更多具体内容可参考文末的相关资料。下面我为大家列出参考相关资料后完成的其中一个测试用例:
1use t::APISIX 'no_plan';
2
3no_long_string();
4no_root_location();
5
6add_block_preprocessor(sub {
7    my ($block) = @_;
8
9    if (! $block->request) {
10        $block->set_value("request", "GET /t");
11    }
12
13    if (! $block->no_error_log && ! $block->error_log) {
14        $block->set_value("no_error_log", "[error]");
15    }
16});
17
18
19run_tests;
20
21__DATA__
22
23=== TEST 1: sanity
24--- config
25    location /t {
26        content_by_lua_block {
27            local configs = {
28                -- full configuration
29                {
30                    path = "file.log"
31                },
32                -- property "path" is required
33                {
34                    path = nil
35                }
36            }
37
38            local plugin = require("apisix.plugins.file-logger")
39
40            for i = 1, #configs do
41                ok, err = plugin.check_schema(configs[i])
42                if err then
43                    ngx.say(err)
44                else
45                    ngx.say("done")
46                end
47            end
48        }
49    }
50--- response_body_like
51done
52property "path" is required
至此插件添加测试环节结束。
总结
以上就是我作为一个后端新手,从 0 开始实现一款 Apache APISIX 插件的全过程。在开发插件的过程中确实碰到了很多坑,比较幸运的是 Apache APISIX 社区里面有很多热心的大佬帮我解惑,使得 file-logger 插件的开发和测试全程都比较顺畅。如果你对这个插件感兴趣,或想要查看插件详情,可以参考 Apache APISIX 官方文档。
目前,Apache APISIX 也在开发其他插件以支持集成更多服务,如果您对此感兴趣,欢迎随时在 GitHub Discussion 中发起讨论,也可通过邮件列表进行交流讨论。