内容转发自公众号“猿方”,原文链接:https://mp.weixin.qq.com/s/Sjy_cutfaUhurQxd_9BVVw。
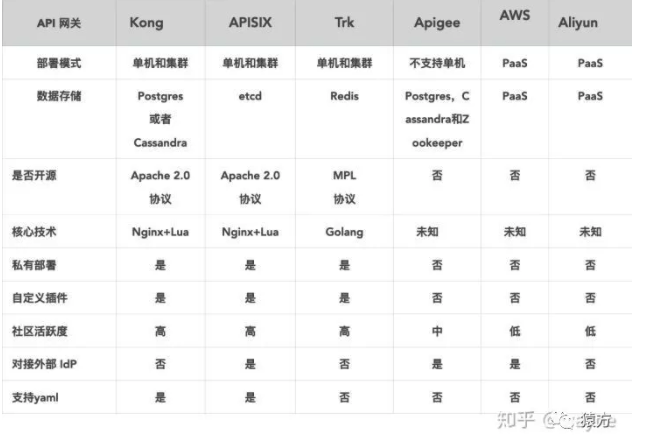
2019 年 10 月,团队计划改造 360 基础运维平台的网关层,当时我们主要调研了社区几个比较活跃的网关,如 Kong,Orange,Apache APISIX,最终选择了 Apache APISIX 当时主要是考虑到 Apache APISIX 的存储选型 etcd 比较符合我们的使用场景。
APISIX 在 2019 年被 支流科技开源,支流科技是一家提供 API 处理和分析的基础软件公司,在 2019 年将 APISIX 开源并捐赠给 Apache 软件基金会。此后,支流科技一直积极投入支持 Apache APISIX 的开发、维护、社区运营,并提供专业的 APISIX SLA、企业版和 SaaS 等产品和服务。与千万贡献者、使用者、支持者一起做出世界级的开源项目,是支流科技努力的目标。
使用 APISIX 后的线上运行情况
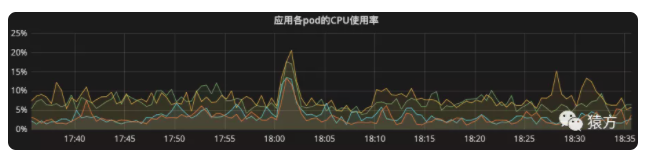
目前我们添加到网关的 API 数量接近 900 个,日均 PV 1000 万左右,从监控系统来看,网关以及我们各个微服务均运行良好。
- 日均 PV

- 网关 POD 监控
- 微服务负载监控图

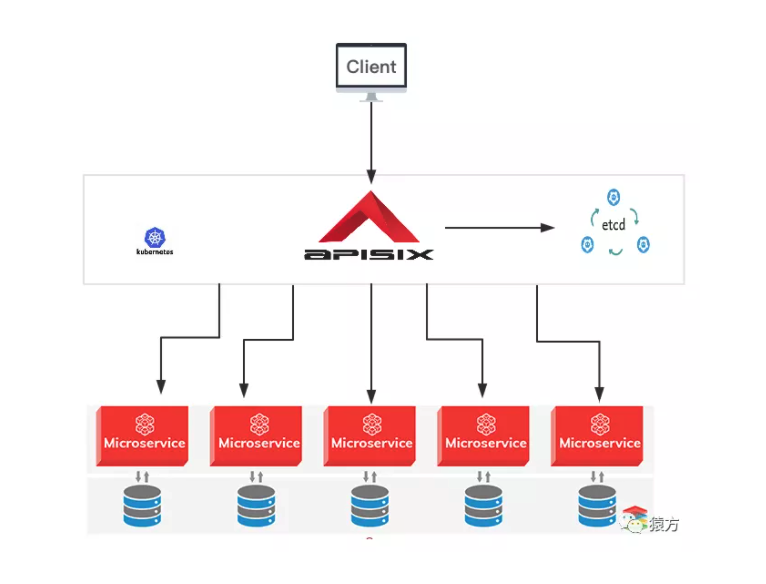
下图是我们运维平台项目最终的架构图,网关服务我们部署在公司的容器云上,etcd 服务我们是在 3 台虚机上部署了一套集群。
如何使用 APISIX 搭建网关服务
接下来我具体介绍一下我们是如何使用 Apache APISIX 搭建网关服务的,首先先给大家看下我们网关项目的代码结构。
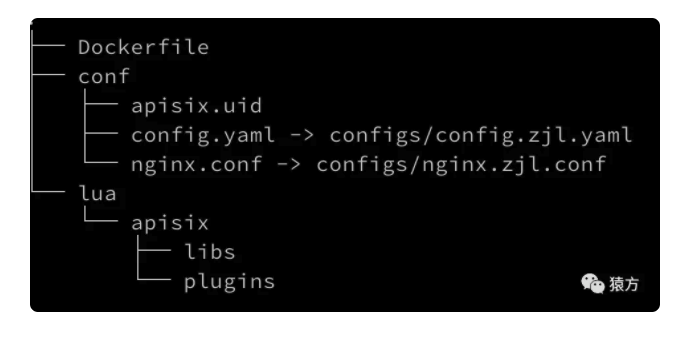
之前我给王院生(Apache APISIX PMC 之一)看我们的项目代码结构时,他惊讶地问我,说怎么没有看到 Apache APISIX 的 core 代码。
实际上这是我们在使用容器安装 Apache APISIX 时探索出来的一条道路。它给我们带来最大的好处是,我们业务的代码和 Apache APISIX 的核心代码完全分开,方便 Apache APISIX 升级,也方便我们的业务代码迭代。
下面我给大家分步演示一下,我们是怎么搭建一个这样的环境的。此处假设大家都了解 Docker 容器技术。
首先启动 openresty 容器。我们团队基于官方的 openresty 镜像,默认安装了一些 Apache APISIX 依赖的软件,如 luarocks 等,重新打包了一个新的镜像,详情可参考 https://hub.docker.com/r/hulklab/openresty/dockerfile。
1docker run -itd -p 9080:9080 -p9443:9443 --name myapisix hulklab/openresty:0.0.1然后通过以下命令进入容器。
1docker exec -it myapisix bash接下来安装 APISIX 0.9 版本。
1luarocks install apisix 0.9-0
2# 安装完你会在最后看到下面这样的一行输出,我们从中可以看出 apisix 的安装目录为 /usr/local/apisix:
3apisix 0.9-0 is now installed in /usr/local (license: Apache License 2.0)
之后进入 Apache APISIX 安装目录。
1cd /usr/local/apisix
2# 进入到 apisix 的安装目录,你会发现里面只有两个目录 `conf` `logs`
3ls -l
4drwxr-xr-x 3 root   root 4096 Dec 18 11:52 confdrwxr-xr-x 2 root   root 4096 Dec 18 11:37 logs
启动 Apache APISIX(运行 OpenResty)。这里我们使用 apisix start 命令启动,它会自动加载 /usr/local/apisix/conf/nginx.conf 配置文件。
1apisix start
2ps aux|grep openresty
3root         1  0.0  0.0  11316  4464 pts/0    Ss+  11:24   0:00 nginx: master process /usr/bin/openresty -g daemon off;root      5040  0.0  0.0  87436  2588 ?        Ss   11:37   0:00 nginx: master process openresty -p /usr/local/apisix -c /usr/local/apisix/conf/nginx.conf
注意,如果执行 apisix start 失败,是因为 Apache APISIX 依赖 etcd,你需要启动 etcd,如何启动 etcd 请参考 etcd 官方文档,启动 etcd 后需要修改 /usr/local/apisix/conf/config.yaml 文件中的 etcd.host 配置, 如:
1config.yaml:69etcd: host: "http://172.17.0.1:2379" # etcd address最后,我们发现 APISIX 成功运行了,但是安装目录 /usr/local/apisix 里面又没有代码,那么 apisix 核心代码以及依赖代码究竟在哪里呢?
从启动的 OpenResty 进程看到,apisix/conf 目录下多出了一个 nginx.conf 文件,这个 nginx.conf 配置文件是 apisix start 命令执行时初始化出来的, 我们查看了一下 nginx.conf 中的 Lua 包引用路径:
1cat /usr/local/apisix/conf/nginx.conf|grep lua_package_path
2lua_package_path  "$prefix/deps/share/lua/5.1/?.lua;/usr/local/apisix/lua/?.lua;;/usr/local/apisix/deps/share/lua/5.1/apisix/lua/?.lua;/usr/local/apisix/deps/share/lua/5.1/?.lua;/usr/share/lua/5.1/apisix/lua/?.lua;/usr/local/share/lua/5.1/apisix/lua/?.lua;/root/.luarocks/share/lua/5.1/?.lua;/root/.luarocks/share/lua/5.1/?/init.lua;/usr/local/share/lua/5.1/?.lua;/usr/local/share/lua/5.1/?/init.lua;./?.lua;/usr/local/lib/lua/5.1/?.lua;/usr/local/lib/lua/5.1/?/init.lua;/usr/share/lua/5.1/?.lua;/usr/share/lua/5.1/?/init.lua;";
从上面的 lua_package_path 中我们挨个查看,从中发现了两个有用的信息:
- Apache APISIX 核心代码的路径:/usr/local/share/lua/5.1/apisix/lua/
- Apache APISIX 安装路径 /usr/local/apisix/lua 下的 lua 文件的加载优先级最高
于是我们做了一个尝试,仿照 Apache APISIX 的插件路径,在 /usr/local/apisix 目录下创建 lua/apisix/plugins/my-plugin.lua,并在配置文件 config.yaml 中添加该插件,发现果然生效了。
在这里贴出我们项目的 Dockerfile 文件,供大家参考。最终我们项目只有 conf 和 lua 两个目录,conf 中存放我们自己定义 config.yaml 和 nginx.conf 配置文件,lua 中存放我们自定义的插件和类库。
1FROM hulklab/openresty:0.0.1
2
3RUN luarocks install apisix 0.9-0; \
4    luarocks install lua-resty-cookie; \
5    luarocks install lua-resty-kafka; \
6    luarocks install lua-resty-url
7
8WORKDIR /usr/local/apisix
9
10RUN rm -rf conf/*; \
11    mkdir -p lua; \
12    mkdir -p logs/archive; \
13    install -d -m 777 /tmp/apisix_cores/
14
15COPY conf conf
16COPY lua lua
17COPY logrotate /etc/logrotate.d
18
19EXPOSE 9080 9443
20
21ENTRYPOINT ["openresty", "-p", "/usr/local/apisix", "-c", "/usr/local/apisix/conf/nginx.conf", "-g", "daemon off;"]
基于 APISIX 的插件化开发
正如上方代码结构图中所看到的,我们项目的 apisix 目录里面有两个目录,libs 和 plugins。libs 里面我们放一些常用的类库,plugins 里面存放我们自定义的业务插件,我们所有的业务都采用插件机制来开发。 下图是我们项目中目前使用到的插件。
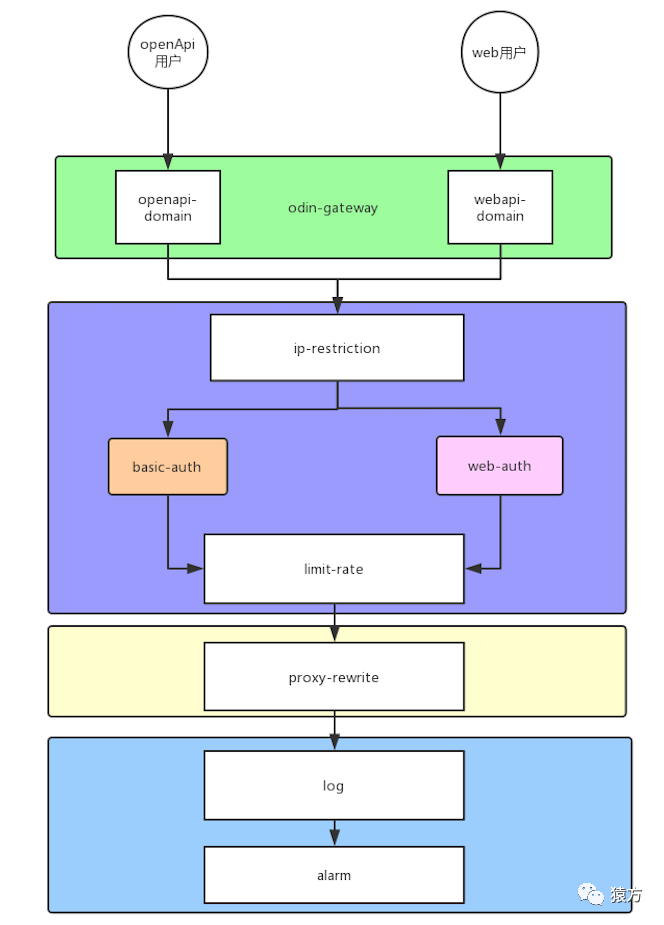
稍微解释一下,我们项目的入口域名有两个,一个是提供给 OpenAPI 访问的,认证插件使用的是 basic-auth,一个是提供给 Web 浏览器访问的,认证插件使用的是 web-auth(Cookie 认证)。
对应 OpenResty 的请求处理流程,我们的插件主要集中在 access 和 log 阶段。下表是我们项目中使用到的插件,以及对应的处理阶段。
| 插件 | 阶段 | 描述 |
|---|---|---|
| ip-restriction | access_by_lua | ip 限流,使用 apisix 原生插件 |
| basic-auth | access_by_lua | 对 openApi 请求用户鉴权,自研插件 |
| web-auth | access_by_lua | 对 webApi 请求用户鉴权,自研插件 |
| limit-rate | access_by_lua | 对请求实现用户级别和用户+请求参数级别的限流,自研插件 |
| proxy-rewrite | access_by_lua,balancer_by_lua | 对请求进行转发,设置接口级别的超时时间,自研插件 |
| log | log_by_lua | 将请求日志记录到 kafka,再通过 logstash 读到 es 中,自研插件 |
| alarm | log_by_lua | 根据响应的 statusCode 来报警,自研插件 |
插件开发样例
接下来以 basic-auth 插件 为例,介绍一下 Apache APISIX 插件是如何开发的。
- 定义插件对象
1  local plugin_name = "odin-basic-auth"
2
3  local schema = {
4   type = "object",
5   properties = {
6    enable = { type = "boolean", default = true, enum = { true, false } },
7   },
8  }
9
10  local _M = {
11   version = 0.1,
12   priority = 2802,
13   name = plugin_name,
14   schema = schema,
15  }
odin-basic-auth 插件只有一个参数 enable,enable 参数表示是否使用本插件,这是由于 Apache APISIX 的插件可以绑定到 Service,也可以绑定到 Route。如果插件绑定到 Service 之后,Route 是没有办法关闭插件的,所以需要一个参数用来精细的控制某个 Route 不使用 Service 绑定的插件,建议官方插件都配上此参数。
- 实现检测插件参数的方法
1  function _M.check_schema(conf)
2   local ok, err = core.schema.check(schema, conf)
3
4   if not ok then
5    return false, err
6   end
7
8   return true
9  end
这里 check_schema 方法基本每个插件都一样。
- 实现插件对应阶段的方法
1  function _M.access(conf, ctx)
2
3   -- 0. 检测配置文件,看看是否开启了 enable
4   if not conf.enable then
5    return
6   end
7
8   -- 1. 获取 basic_auth 里面的 username 和 password
9   local headers = ngx.req.get_headers()
10   if not headers.Authorization then
11    return 401, { message = "authorization is required" }
12   end
13
14   local username, password, err = extract_auth_header(headers.Authorization)
15   if err then
16    return 401, { message = err }
17   end
18
19   -- 2. 查看 etcd 获取 username 对应的记录
20   local res = authorizations_etcd:get(username)
21   if res == nil then
22    return 401, { message = "failed to find authorization from etcd" }
23   end
24
25   -- 3. 如果没有,报认证失败
26   if not res.value or not res.value.id then
27    return 401, { message = "user is not found" }
28   end
29
30   local value = res.value
31
32   -- 4. 如果有,判断是否用户密码是否正确
33   if value.password ~= password then
34    return 401, { message = "password is error" }
35   end
36  end
etcd 缓存对象
上面样例中的第二步,我们获取当前请求用户的实际密码以及授权路由列表时使用了 authorizations_etcd:get(username), 这里使用到了 Apache APISIX 的 etcd 缓存对象。
etcd 缓存对象的原理是利用 etcd 的 Watch 功能,将数据从 etcd 缓存到内存对象中,业务使用的时候直接从内存中读取,避免网络 IO 消耗,etcd 的 Watch 功能又保障了数据的实时性,Apache APISIX 的这一特性,简直是让人拍案叫绝。
下面介绍一下如何使用这个功能。
- 定义一个 etcd 环境对象变量
1  local authorizations_etcd
2
3  -- 定义 etcd 对象储存的值 scheme
4  local appkey_scheme = {
5   type = "object",
6   properties = {
7    username = {
8     description = "username",
9     type = "string",
10    },
11    password = {
12     type = "string",
13    }
14   },
15 }- 在插件的 init 阶段实例化
1  function _M.init()
2
3   authorizations_etcd, err = core.config.new("/authorizations", {
4    automatic = true,
5    item_schema = appkey_scheme
6   })
7
8   if not authorizations_etcd then
9    error("failed to create etcd instance for fetching authorizations: " .. err)
10    return
11   end
12
13  end
插件的 init 方法发生在 OpenResty 的 init_worker_by_lua 阶段。换句话说,每个 worker 只初始化一次。automatic 参数设置为 true,Apache APISIX 会开启 Watch 功能。业务层只需要实例化 etcd 缓存对象,剩余的事情就都交给 Apache APISIX 做了。
- 插件中使用 etcd 缓存对象
1 local res = authorizations_etcd:get(username)插件 API 的使用
上文中 etcd 缓存对象的本质还是需要从 etcd 中取数据,那么这个插件中使用到的用户相关数据是怎么添加到 etcd 呢?这不得不提到插件另一个让人尖叫的特性:API 特性。
定义 API
1  function _M.API()
2   return {
3    {
4     methods = { "POST", "PUT" },
5     uri = "/apisix/plugin/basic-auth/set",
6     handler = set_auth,
7    }
8   }
9  end
实现 API 的 handler
1  local function set_auth()
2   local username = req.get_str("username")
3   local password = req.get_str("password")
4
5   local key = "/authorizations/" .. username
6
7   -- 此处存入到 etcd
8   local res, err = core.etcd.set(key, { username = username, password = password})
9   if not res then
10    core.response.exit(500, err)
11   end
12
13   core.response.exit(res.status, res.body)
14  end
调用接口
1curl -i -X PUT 'http://127.0.0.1:9080/apisix/plugin/basic-auth/set' -d username=zhangsan -d password=hao123 -d user_id=3 -d action_ids=,1,2,3,上线后遇到的问题
crontab 清理日结
由于我们网关部署在容器,运行一段时间之后,日志文件超过了默认的配额 50G,后来我们在镜像里面默认安装了 cron 和 logrotate,然后在容器 entrypoint 里面开启了 cron 用来解决这个问题。